Tuesday 28 February 2017

Scrap N' Dipity Spotlight

Hello, my friends!

Thanks so much for stopping by today!
It's my spotlight post over at Scrap N' Dipity.
This will be my final post as a part of the Design Team.
I've made the difficult decision to step down.
You'll still be seeing more of these cute images from me though.
They're so fun to work with, and Alisha is fantastic.
She has graciously left the door open for me to return one day.

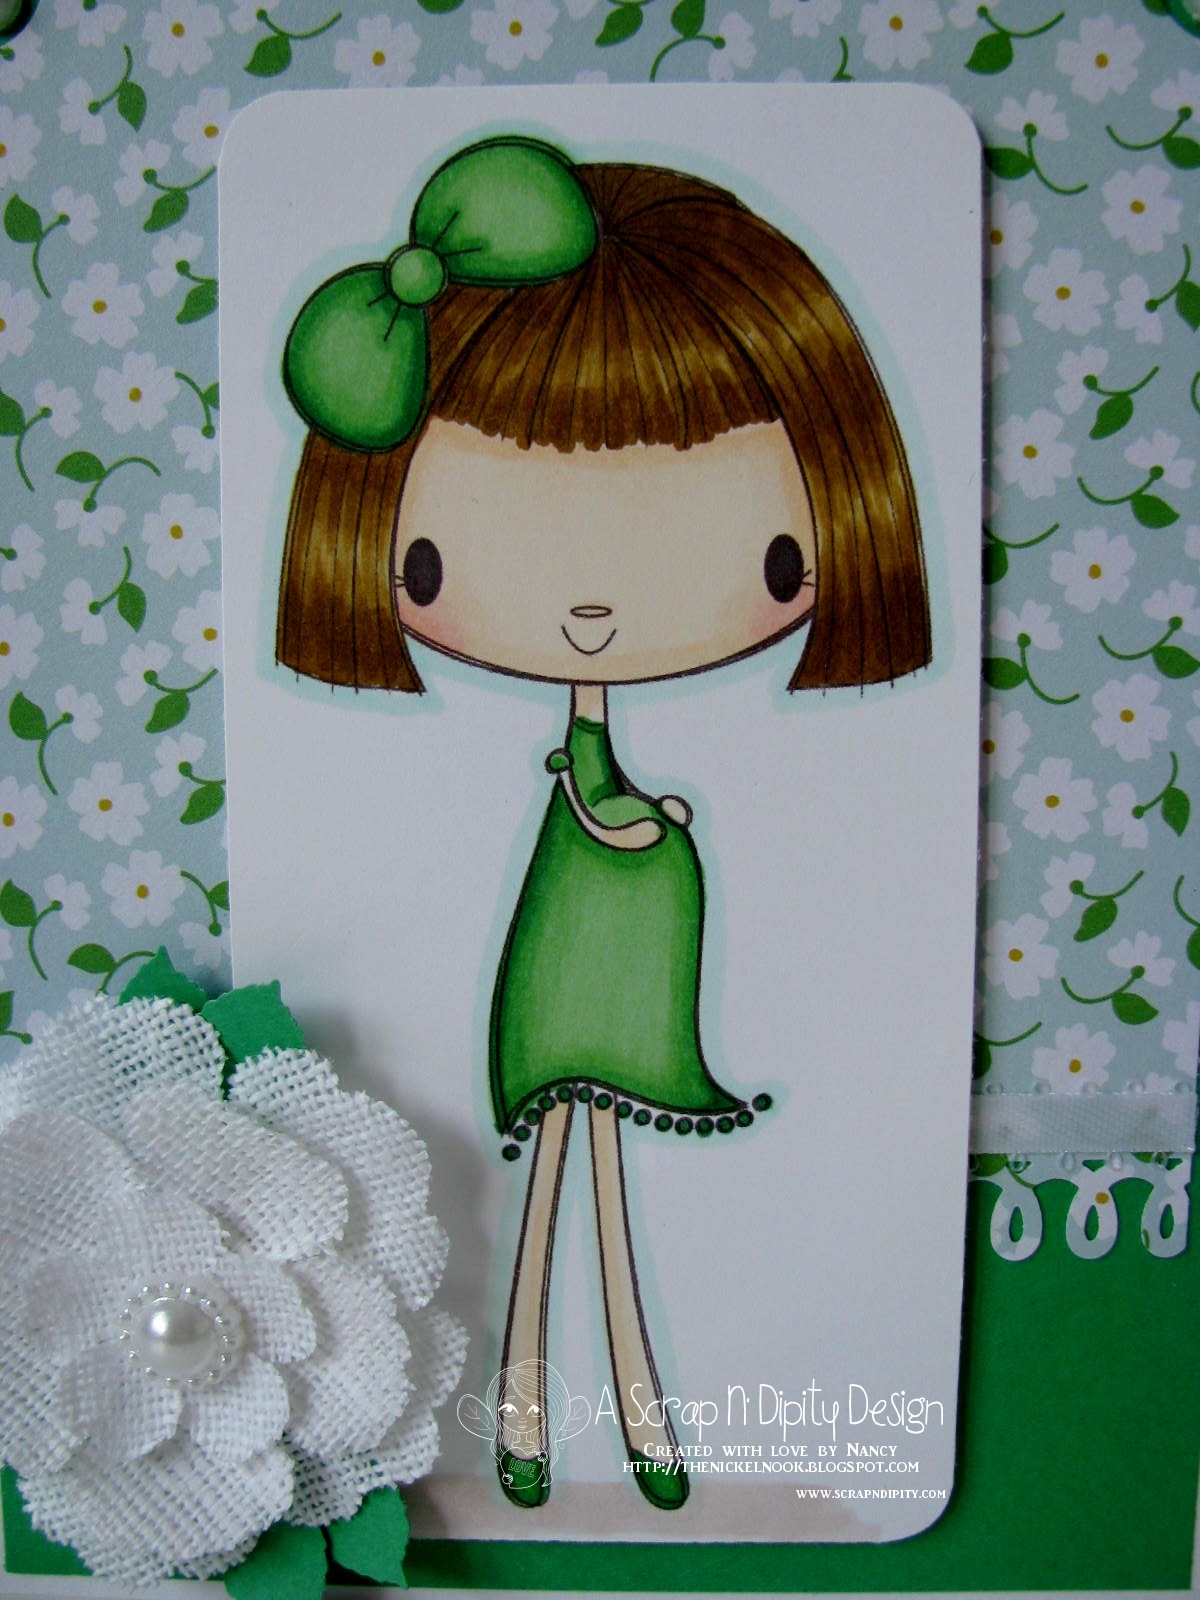
This is the lovely "Scribble Sally - I'm Pregnant" image,
which you can find right HERE.


Materials Used:
Papers: Recollections - Cardstick, Project Life - Desktop Edition;
Image: Scrap N' Dipity - Scribble Sally - I'm Pregnant;
Coloring: Spectrum Noir Markers;
Punches: Martha Stewart - Loops Border, Rose Leaf;
Bling: Crafts - Pearls;
Ribbon: Offray;
Flower: My Stash.

* * * * *
Don't forget to join our latest challenge.

Here are all the links you're going to need:


Sunday 26 February 2017

Tutti Designs - Daisy Panel Gate Fold Card

Hello, my friends!

It's Monday, and I'm back with a new Tutti Designs share!

This week I'm using the lovely "Daisy Panel Die" from the October release.
You can find it right HERE.

Here's the gate fold card that I made:


Now I will show you how I made it.
Using a pretty, double-sided paper, I cut the die twice.
Here you see both sides of the paper; a printed side and a solid side.


Here I have turned them so that the printed side faces up on both. 
If you look closely, you can tell that the one on the left is wrong side up. 
An easy way to fix this is to run a bone folder over the edges of the die-cut to smooth them out. 


Next, I adhered each of the die-cuts onto the solid colored paper.


Setting those pieces aside, I went on to create the card base.
I cut a piece of cardstock that measured 10" X 6 1/2".
I scored this cardstock 2 1/2" from each end, folding towards the center. 
I adhered a ribbon along the middle of the card, beginning at the back, and wrapping around the front panels.


All that was left was to adhere the Daisy panels to the front of the card panels, and tie the ribbon in a bow.
Finally, I added a few random pearls in the centers of the flowers.


Here's the inside of the card. 
I added a Nesting Stitched Oval die-cut to the center.
The perfect spot to stamp a sentiment and add a message!


Materials Used:
Papers: Recollections - Cardstock, Unknown;
Pearls: Basic Grey;
Ribbon: Celebrate It;
Tools: Big Shot.

Tutti Designs Dies Used:

Daisy Panel Die


* * * * *
I'll be back next week with a new project.
In the meantime, here are all the links you'll need:


Sunday 19 February 2017

Tutti Designs - Easter Lilies Window

Hello, my friends!

It's Monday, and I'm back with a new Tutti Designs share!

I was excited to create with this "Easter Lilies Window" die,
which you can find HERE.
There are so many possibilities!

First, here's the finished card:


Now let me show you how I did it.
I began by cutting the die out of black cardstock
Then I adhered the die onto another piece of black cardstock.
I was excited to use my brand new Sakura Souffle Pens.
Next, I just went about coloring. 
This was very easy to do, since each bit was framed with the die-cut.


Here it is all colored up:


To finish it off, I cut the die again out of black cardstock.
I adhered this one directly on top of the colored piece.
It just crisped up all the edges, and added a bit more dimension. 

Now it was time to create the card. 
I trimmed around the colored piece right along the edge of the die.
I placed it on pink cardstock and trimmed it leaving about 1/8" around.
Then I did the same again by placing it on a black card base.
This time I trimmed it leaving 1/4" around, with the fold at the top.
Finally, I added a pretty ribbon bow.


Such a beautiful die!


Materials Used:
Papers: Recollections - Cardstock;
Color: Sakura Souffle Pens;
Ribbon: Celebrate It;
Tools: Big Shot.

Tutti Designs Die - Easter Lilies Window


* * * * *
I'll be back next week with a new project.
In the meantime, here are all the links you'll need:


Wednesday 15 February 2017

All Dressed Up - Challenge #66

Hello, my friends!

Today is the beginning of a new challenge at All Dressed Up!
The challenges are always Anything Goes but you MUST use an image from All Dressed Up.
There are freebies available at the challenge blog HERE! :o)

I used the fabulous "Time to Relax" image,
which you can find in the shop HERE.

I love this image and thought it would be perfect for my January Calendar page.
I had so much fun with my calendar last year, so I'm doing it again this year. 
These pages measure 5 X 7, and have a white chipboard base.
I realize that it's already February but I made this in January.


Materials Used:
Papers: Echo Park - Hello Winter Digital Papers;
Image: All Dressed Up - Time to Relax;
Colouring: Spectrum Noir Markers;
Dies: Spellbinders Nestabilities - Romantic Rectangles Two,
Simon Says Stamp - Coffee Cup Craft Die;
Ink: Martha Stewart - Blue Sky;
Bling: Rhinestone Stickers;
Other: Maya Road 2017 Calendar Printout.

* * * * *
* * * * *
Head on over to the Challenge Blog and join the fun! :o)

Here are all the links you'll need:


The Project Bin - When I Look At You...

Happy Wednesday, my friends!

Today I'm back with another project for The Project Bin
This week I'm sharing a sweet sentiment from the "Fun is Good" Stamp Set,
which you can find HERE.

I had a design in mind when I saw this sentiment,
and was so happy to find exactly what I wanted in Cricut Design Space.
The cut included just the little house on the right side.
After cutting it, I added the oval die cut to display my sentiment.
I backed the cut card front with white cardstock.
I stamped the sentiment in the oval,
and added some pink punched hearts to the house.


Finally, I added a pretty double bow.


Here's a closer look at the sentiment:


Materials Used:
Cut: Cricut Design Space - House Card;
Ink: Martha Stewart - Pink Geranium,
Stampin' Up - Tempting Turquoise;
Die: Tutti Designs - Stitched Nesting Ovals;
Punch: Martha Stewart - Heart Punch;
Tools: Cricut Explore Air, WRMK Precision Press. 

The Project Bin - Fun is Good Stamp Set


* * * * *
If you're not familiar with The Project Bin,
they specialize in wonderful sentiment stamps.
They're clear photopolymer and stamp as crisp as can be!
Each set has multiple stamps, and 
"A Way With Words."

* * * * *
I'll be back next week to share another wonderful stamp! :o)
In the meantime...

Here are all the links you'll need:


Tuesday 14 February 2017

Miss Daisy Stamps DT - Spunky the Mouse

Hello, my friends!

Happy Valentine's Day to all of you! 
I hope you all know that you are loved! :o)

I have a new card to share with you today, 
using an image from Miss Daisy Stamps.

This one is called "Spunky the Mouse" image,
which you can find HERE.

Isn't he cute?
He's not a real mouse, so I can say that, right? lol

I colored him up with my Spectrum Noir markers,
and then fussy cut him out.
I matted my card with a matching blue cardstock.


I added two ribbon strips across the card front.
I punched a bunch of hearts out of red cardstock,
and scattered them about.


Finally, I popped Spunky up on foam squares.
Here's a closer look at the image:


Materials Used:
Papers: Recollections - Cardstock;
Image: Miss Daisy Stamps - Spunky the Mouse;
Coloring: Spectrum Noir Markers;
Punch: Martha Stewart - Heartbeat Punch;
Ribbon: Offray.

* * * * *
Head on over to Miss Daisy Stamps.
There have been LOTS of new goodies added to the shop!

Here are all the links:


Kathryne is very generous with gifts and surprises.

You'll want to sign up so you don't miss any of the fun!

Sunday 12 February 2017

Tutti Designs - One Final LOVE Card

Hello, my friends!

It's Monday, and I'm back with a new Tutti Designs share!

I have again combined two die sets.
This week it's the Nesting Stitched Ovals, and Word Set - Love Dies.

There are eight ovals in this fabulous set, and I used three of them.
The "Love" comes in two different sizes, and I used the larger one.


First, I made my card base and matted it.
Then I chose the oval that fit the "Love" die the best, and cut that out.
I chose two more papers and cut them out in the next two size ovals.
The largest oval was adhered flat to the base.
The two smaller ovals were popped up on foam tape.
It adds wonderful dimension.
Finally, I added a triple loop ribbon bow!


Here's a closer look at the dies:


Other Materials Used:
Papers: Basic Grey - Kissing Booth;
Ink: Distress Ink - Walnut Stain;
Ribbon: Offray - Brown.

Tutti Designs Dies Used:


Word Set - Love

* * * * *
I'll be back next week with a new project.
In the meantime, here are all the links you'll need:


Wednesday 8 February 2017

The Project Bin - Just Poppin' Again!

Happy Wednesday, my friends!

Today I'm back with another project for The Project Bin

This week I'm sharing another card using the super fun "Just Poppin' Stamp and Die Set",
which you can find right HERE.

There are endless options with this stamp set.


After stamping the sentiment, I die-cut it, and then "popped" it up on foam tape.
Some simple strips of ribbon, and a yellow card base,
and it was all finished. 


Here's a closer look at the sentiment:


Other Materials Used:
Papers: Recollections - Cardstock;
Dies: Spellbinders Nestabilities - Labels Eighteen;
Ink: Memento - Tuxedo Black;
Marker: Marvy Le Plume II - No 5 Yellow;
Ribbon: Offray - Yellow.

The Project Bin - Just Poppin' Stamp & Die Set


* * * * *
If you're not familiar with The Project Bin,
they specialize in wonderful sentiment stamps.
They're clear photopolymer and stamp as crisp as can be!
Each set has multiple stamps, and 
"A Way With Words."

* * * * *
I'll be back next week to share another wonderful stamp! :o)
In the meantime...

Here are all the links you'll need:


Tuesday 7 February 2017

New Release at All Dressed Up - Be My Valentine

Hello, my friend!

Welcome to a New Release post for All Dressed Up!
I'll be here on the 7th of each month to share a fun new image with you! :o)

Today I'm sharing a new image called "Be My Valentine",
which you can find HERE.


Isn't he adorable?


Here you can see the lovely shimmer on the bow.
That's the clear Atyou Spica Marker.


Materials Used:
Papers: Basic Grey - Kissing Booth, 
Image: All Dressed Up - Be My Valentine;
Coloring: Spectrum Noir Markers;
Dies: Spellbinders Nestabilities - Elegant Ovals;
Flowers: Prima;
Brads: EK Success;
Sparkle: Atyou Spica - Clear.

* * * * *
Head on over to the blog to check out all the other wonderful new release images, 
and see what everyone else has created! :o)

* * * * *
Here are all the links you'll need:


Blog Archive